The F4RN broadband network provides a fibre optic cable all the way to the property – something generally referred to as “Fibre to the Home” (FTTH) or “Fibre to the Property” (FTTP). This means that the broadband signal is transmitted by light along its entire route so the speed of the connection is not affected by the distance you are from our central equipment.
This is very different to the service provided by most other internet companies outside of the city centre – even for their “fibre optic” broadband, they use a system called “Fibre to the Cabinet” (FTTC) where the fibre only comes as far as the nearest green roadside cabinet. After that the signal is sent down the old copper or aluminium telephone cables, so the quality of your broadband connection depends on how far you are from the green cabinet and the condition of the telephone wires. So FTTC is usually OK if you live close to the cabinet but not so great if you are further away…
So what’s involved in getting the F4RN FTTH connection?
Along with lots of volunteers, and with a lot of support from our local farmers and landowners, we are building the main fibre route around the edge of the village. Our aim is to bring the fibre as close as possible to each property.
To make the final connection to each property it’s necessary to lay a very thin plastic pipe (a duct, 7mm in diameter) from a local chamber to the outside of your property close to where you want the internet connection to come into the building.
As a volunteer project, the part on your land is what we like you to help with, fitness permitting, of course.
The key steps are…
- Contact us and we will locate the F4RN ducting and confirm with you where it needs to run
-
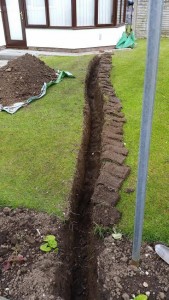
The final connection to the property involves burying a 7mm diameter duct in a shallow trench If you can, dig a trench to lay the duct. It’s up to you how deep the trench needs to be – across a garden it only needs to be the depth of a spade, but remember that the duct will be there for many years so make sure you know where it is and it’s not somewhere that you expect to be digging again any time soon! The trench needs to be reasonably straight as we have to blow the fibre through the duct and it does not like going round sharp bends.
-
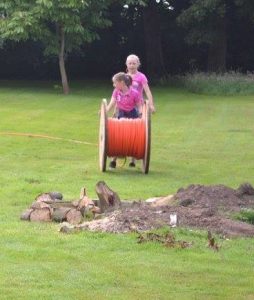
A drum of ducting and some of our enthusiastic volunteers We will provide the ducting – lay this in the trench making sure that it’s reasonably straight and is not going to be damaged by sharp stones.
-
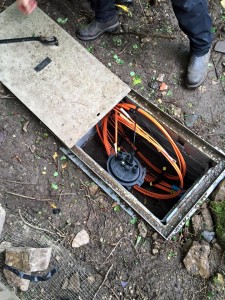
A joint in the plastic duct Close to the property we need to change from the orange duct (which has to be buried) to UV-resistant black duct that can be run above ground.
-
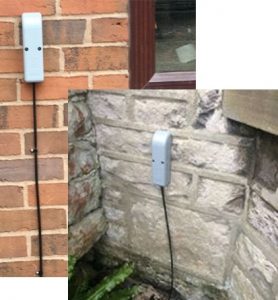
Wall boxes mounted where the fibre enters the property Where the fibre enters the property, we will mount a grey plastic box which guides and protects the fibre.
- It’s necessary to drill a hole through the wall – we will usually do this.
-
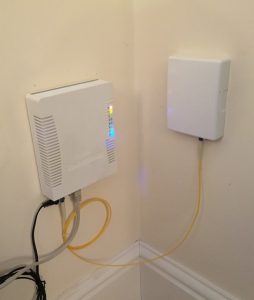
Final connection and fibre optic router inside the property And then inside the property we mount a small, white, plastic box where the fibre is terminated. This needs to be within ~1m of a spare power outlet as the broadband router requires power.
Once that is all complete we can blow the fibre through the duct, splice it to the core network and get you online.
Some important points to remember
- When you install the duct it’s important to seal the ends so that water and mud don’t get inside. We can provide some special end caps but if these are not available then tape will do
- The duct needs to be kept as straight as possible – the fibre can be blown round bends but ideally these need to be kept to a minimum
- Bends should be gentle – so ideally a bend radius of at least 10-15cm
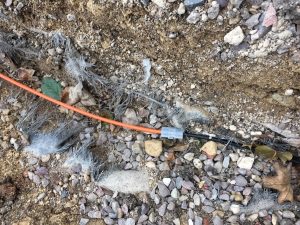
- Avoid crushing the ducting. When you bury it avoid any large or sharp stones.
- It’s best to leave some duct at the ends of your run – but it’s not the end of the world if we do have to put in a joint
- If you are drilling through your wall take care to avoid electric cables, pipes etc
- When we install your modem, it needs to near a spare power socket and also somewhere that you can plug directly into it and/or you can get the best WiFi coverage.
- To get full benefit from the superfast broadband speeds you may need to install an extra wireless access point or range extender, or consider installing extra hard-wired Ethernet sockets to get the maximum performance. See our guides on the F4RN web site at https://f4rn.org.uk/faqs and https://f4rn.org.uk/faqs/faq-wifi/
When you plan the location of your fibre connection / router consider carefully…
- What is the best place to provide WiFi coverage? So ideally somewhere reasonably central and where the WiFi signal is not blocked by any thick walls or large metal items (eg piano frames)
- What do you want to plug straight into the router? The full speed of the superfast internet connection can only be obtained by devices that are plugged directly into the router (not WiFi). Can it be located in an office? Or perhaps near a smart TV / games console (although ideally not directly behind the TV)
- The router is connected to the fibre outlet (the white box inside the house) by a short fibre optic cable (1m long). Where will the router be located so that it is safe? (and won’t get caught up in the vacuum cleaner!) Can the fibre run from the outlet to the router without getting in the way of a plug / socket.
- We need reasonable access to the white box where the fibre is terminated in order to complete the installation. Also make sure that the box is not fitted directly above a power socket or anything else that would block the fibre entry at the bottom.